
Today, june 23rd is la noche de San Juan (or la revetlla de Sant Joan) so we are making a traditional recipe, a sweet baked good that’s normally enjoyed today. It’s called Coca de Sant Joan and it’s a brioche-like base with pastry cream on top.
I’m going to be making a series of spanish traditional recipes, both here in my blog and my new youtube cooking channel. This seems to be the no-travel year, so let’s just travel with our tastebuds, shall we? I’m always amazed by the amount of customers that tell me that they’ve travelled to Spain and loved both the weather and the food. I can not send you the weather all the way to your home, but I can share my recipes with you!
My intention is making spanish recipes that you can replicate at home, so get ready for tricks and the use of appliances that are not traditionally used here in Spain, like a slow cooker or an instant pot.
Let’s start our process today by making pastry cream easily in the microwave. Yes, we are making it in the microwave!
These ingredients listed make 1 liter pastry cream and two large cocas. There’s enough leftover pastry cream for filling one of the cocas.
For the pastry cream we’ll need: 1 liter milk, 4 heaping tablespoons cornstarch, 6 heaping tablespoons sugar, 5 egg yolks (mine were small) and lemon peel.

In a large bowl, add 500 ml cold milk and the cornstarch. Wisk them together.


Add the sugar.

Add lightly beaten egg yolks.

Wisk, wisk, wisk…

In a jug, heat the other 500 ml milk with those lemon peels.

Add the hot milk to the cold ingredients and wisk again.

Microwave the bowl for a couple minutes on high. Carefully take it out of the microwave (it will be hot) and wisk.

No change yet. Microwave it for another 2 minutes, then wisk again. Repeat this process until you see that the cream starts to thicken:

Then microwave it for 1 minute at the time.
I had to microwave mi pasty cream for 6 minutes total. But the exact amount of time depends on the microwave power level.

Once the cream is nice and thick, transfer it to another bowl (so that it cools faster) and cover it with a plastic wrap (touching the surface). This way the cream doesn’t get a dry surface. Stick this bowl on the fridge. We need it fully cooled for using it later.
Now we are going to make the dough. I’m going to make it using a stand mixer, but it can do it by hand. It’s very similar to this donut dough I kneaded by hand.
We’ll start by adding 320 g warm milk (not hot) to our mixing bowl.

Then, 14 g dried bread yeast

And 2 tablespoons sugar.

Give these a good wisk.

Cover it with bread flower (5-6 tablespoons), without combining it. Just let the flower sit at the top of the mixture.

Let that sit for about 10 minutes until you see that the yeast is active.

There will be small bubbles and cracks in the flower surface. We are ready to start adding more ingredients.

We’ll be using 2 eggs, 175 g unsalted butter, 250 g sugar and a pinch of salt (it’s added in my sugar bowl).

Add the sugar.

Add the eggs and melted butter.

Start adding bread flour. I ended up using about 800 g flour, but this just depends on the kind of flour, how large the eggs are… etc. Just watch your dough and you’ll know when you have to stop adding flour.

Flour + kneading…

A ball starts to form.
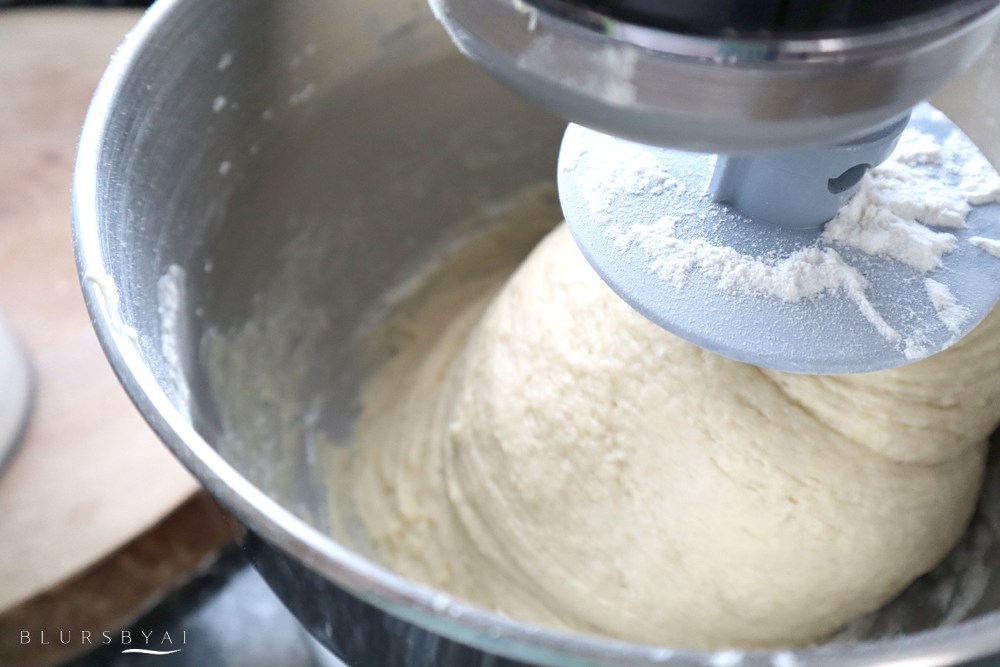
When the dough can be formed into a ball, transfer it to a clean, slightly greased bowl.


You’ll know it is ready to rest when you poke it (lightly) and the dough springs back.
If you want the dough to rise faster, this is what you can do. In a bowl add hot water, then place the second bowl with the dough on top of the hot water, then cover it (with a lid or with plastic wrap) and then cover it all with a clean kitchen towel.


The dough will be ready when it has doubled in size:

It could be more smooth if I had kneaded it longer (ouch).

Line two cookie baking trays with parchment paper and a bit of oil.

Split the ball in half and roll it out. Mine is 2 cm thick.
With a knife we are going to make a cris cross pattern that will help us with the placement of the pastry cream.
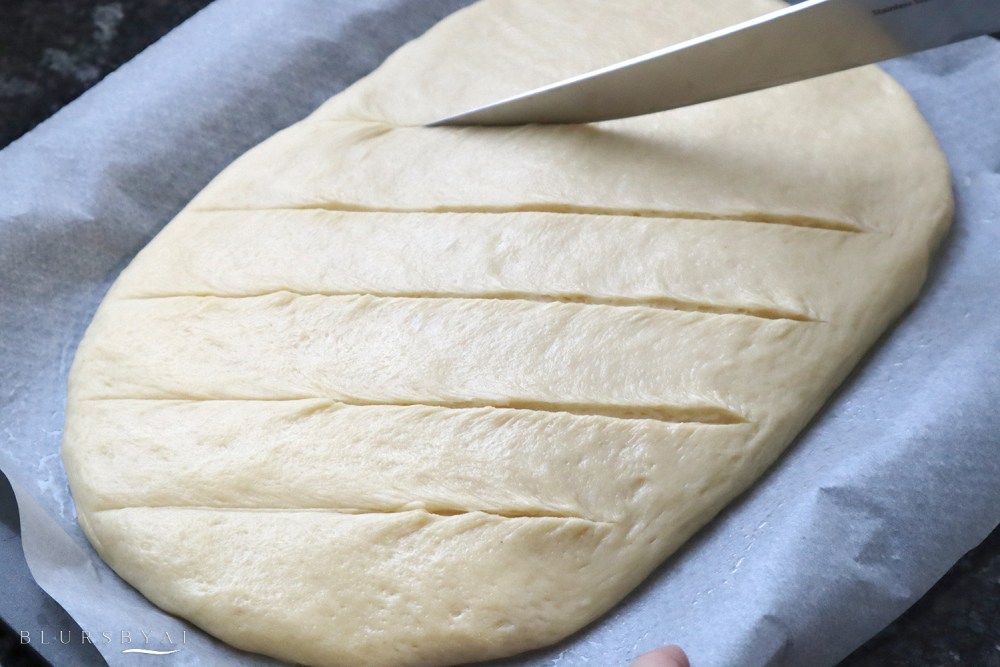
Cris cross it all the way…

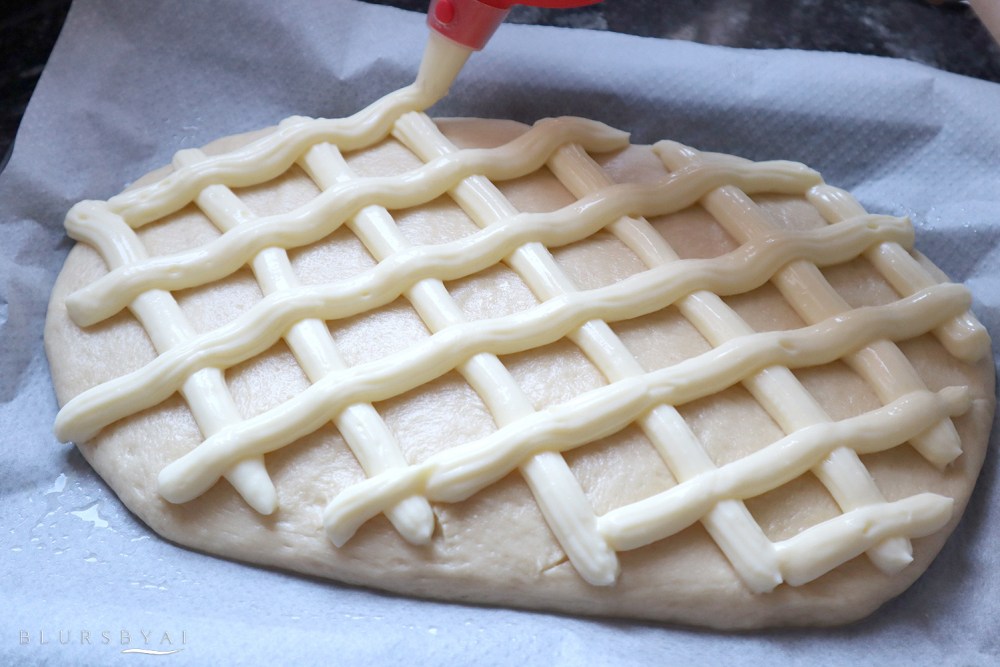
Now this is the fun part! Get the cold pastry cream into a piping bag and follow those cut lines:

This is very satisfiying!

It looks gorgeous, doesn’t it? This is how it should look when you are done decorating the coca with the cream.
At this point you can add: sliced almonds, candied fruit, candied cherries, pine nuts and sugar. I was going to add sliced almonds but they were near my spices and they tasted like ginger and cayenne pepper… so I couldn’t. If you are going to use almonds or pine nuts (which is very traditional), soak them in water while you make the dough. This way they won’t burn in the oven.
Let it rest for 15-20 minutes before baking it in a 180ºC preheated oven (350º F) for around 30 minutes. Time lapse of the cocas baking:
And this recipe yields two cocas… And a lot of pastry cream (you can cut the coca and fill it with the leftover pasty cream, by the way).
And this is the finished coca de Sant Joan. It’s sweet, but not too sweet, it’s tasty and perfect on its own, with coffee, vanilla ice cream or a dollop of heavy cream.

Ñam!

I hope you like this recipe and give it a try, specially if you have eaten it here in Spain and want to bring back some memories.
